Wednesday, July 11, 2012

Steering cabin Hull Repairs


                                 Steering cabin hull repairs

It was noticed before the installation of the actual teak deck could start that there were a few pieces of wood of the forward cabin, aft cabin and the steering hut had rotten wood where it is connected to the deck.
The main challenges were port side from the front cabin window to the aft side of the aft cabin, starboard side front part of where the side window meets the front window and a small part starboard side aft cabin corner of the window.

On portside instead of replacing small parts of the wood it was decided to remove complete the first plank of the deck house from the front cabin aft window to the end of the aft cabin port side.


Although difficult to see from the next picture earlier repairs were made with some kind of epoxy with wood chips this needed complete to be removed as well.


Before the plank was removed supports were place inside of the cabin to keep the deck house in the same and correct position, it is important to spent quite some time installing these supports otherwise the windows will not close properly anymore.

 
The new to be installed plank was then placed in position, 5 meter/ 15 foot long although one would expect that this would be a straight forward installation it took quite a long time to get the plank fitted properly.
The reason for this is that not only the deck is placed in an angle compared to the deck house but also the deck is not completely plat over 5 meter length and runs in a small curve.

When all fitted well and the plank was in place the position of the aft cabin windows was marked on the plank, plank removed again and the necessary wood was cut out.


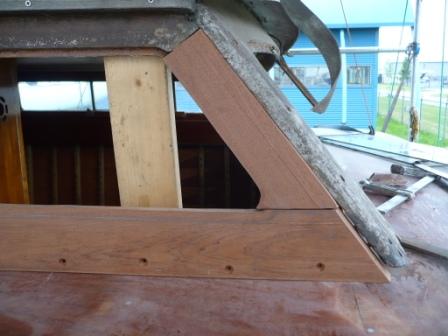
The next step was to fabricate the vertical aft window frame, and connect this to the horizontal lower window plank, new, and the horizontal top window frame old and still in place.
Same challenges with this piece of wood the horizontal plank should be properly fitted in place due to the angle between the deck and the deck house.


Original construction was used for installing this piece of window frame vertical window part had two wooden pegs with fitted in the original top window frame and in the new bottom window frame.


First the wooden pegs were cut out of the extra wood of the vertical window frame next step was to cut out a hole in the horizontal new window frame, first small holes were drilled next step larger holes were drilled and then the rest of the wood was removed with a chisel and hammer till all fitted correctly.


Than the complete plank was glued with colored epoxy glue in place while at the same time the vertical window frame was glued in place as well. This needed to be done otherwise it is impossible to get this vertical window frame fitted.
To make sure that the still installed plank of the deck house would like up with the new to be installed plank wooden pegs were installed in a groove in both planks.
These grooves were made with a specific tool designed for these purpose unfortunately I forgot to make pictures of this type of installation. On the inside of the cabin the new plank was kept in place with small blocks of wood screwed to the new plank and to the deck support beam, both should line up.


With the new plank fitted the actual window frame needed to be worked on to be able to fit the actual windows.
Window frame were kept smaller than actually needed, few mm and sanded down to the correct seize to be able to fit the windows.
First the windows were placed in front of the wood, markings were made windows removed and with a router the actual groove was made to fit the actual window in place.


When everything fitted correctly the window frame groove was coated with thin epoxy to protect the wood from water for the future.


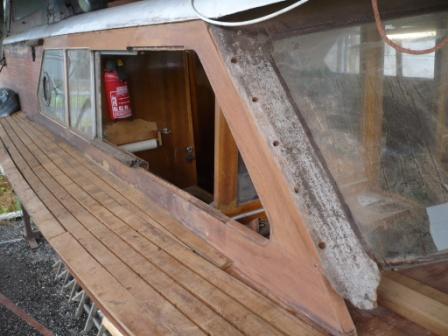
Last picture shows the finished installation of the window frame with the plank screwed in place to the inside beams and holed plugged.


Next larger window frame repair was the starboard side front cabin window frame.
Portside window frame in the same position is still in good condition.

As can be seen from the following pictures there is quite an amount of rotten wood on both horizontal and vertical frames.


The window frame was cut away until good solid wood was found and a new frame was made.


The vertical window frame from the front windows will be replaced in a later stage but was needed to get the correct angle of installation of the vertical window frame of the side window.

Since the window frame of the transversal front windows was disconnected from the deck it had moved slightly in the direction of the aft ship. As can be seen from the next picture the front window moved in the aft ship direction after removal of the vertical side window frame.


This had as a result that the first vertical window frame although fitted well did not look very good it was tapered. Also due to the rotten wood it was not possible to take good measurements of the removed wood.

In short a new part of the window frame was made and installed in the same way as the aft vertical window frame was fabricated.


As can be seen from some of the last pictures some teak has been installed.
The teak deck installation will be the next blog when the complete teak deck installation is finished.
Unfortunately at this time the weather is not in favor for completing the installation of the teak deck lots of rainy days


Tuesday, May 1, 2012

Preparation for Teak Deck


                                   Preparation for Teak Deck Installation


Due to the removal of the original teak deck between the sub deck and the deck house a gap remained.
This gap needed to be closed before the actual installation of the teak deck could be started.

There were two options discussed to close the gap, one was to fabricate a teak plank which would be slide under the deck house and at the same time would be a “guide” plank where the teak deck planks would be fitted against, the challenge here was that the gap was bigger than the new to be installed teak plank 12 mm compared to the original 16 mm. Second option was to fill the gap between the new sub deck and the deck house with a mahogany filling plank.
The last option was chosen.
Since there is some damage to the deck due to the removal of the teak planks it was decided to place a slightly thicker filling plank than the actual width of the gap.


First step was to fabricate a filling plank bearing in mind that the gap was around 16 mm, original thickness of the teak it was decided to make the filing plank 19 mm thick, this way approximately 4 mm was removed from the bottom side of the deck house, 1 mm for the thickness of the multi tool saw-blade.
Since there is an angle between the deck house and the actual deck, angle measurements were taken before the actual filling plank was made, bearing in mind that the filling plank should make a 90 degree angle with the sub deck.


With the filling plank prepared approximately 3 mm was cut from the bottom side of the deck house with the multi tool, using as a guide the to be installed filling plank.


In my case also the inside support planks between the deck house and the actual deck
beams were mainly rotten away and it was decided to completely renew these planks as well.
When these planks are removed the deck house is more or less loose from the actual deck construction and can move downwards and outwards. This might result in that when the filling planks are glued in position that the deck house will not be in the original position anymore. Therefore several temporarily supports were installed between the deck beams and the deck house. After these supports were insalled the complete plank was removed.


The new filling plank was fitted and glued in place with two component epoxy glue with an added mahogany pigment to match the color of the wood installed
To make sure that the glue line would be minimal pegs were installed to push the filling plank against the original deck house. Also the filling plank was installed in such a way that it slightly was sticking out of the deck house.


After curing of the glue the filling plank was sanded smooth with the deck house in the same angle as the deck house, this means a small part was removed from the filling plank at the top, but not at the bottom.


The reason that the bottom should not be sanded is that the bottom side of the filling plank should be with a 90 degree angle with the sub deck for proper installation of the new teak deck as can be seen from below picture


When everything was sanded and protected with linseed oil the result is more than satisfying in my opinion, also the next picture shows the teak plank in front of the filling plank under the deck house.


A new plank between the deck house and the deck beam was installed inside and plugs which was fixed in place with news screws and plugs.


Wednesday, April 4, 2012

Replacement Deck Next to Cabin


                                  Replacement of the deck sides, next to the Deck House.

The only parts left before the new teak deck can be installed are the sides of the deck next to the deck-house. The sides of the actual deck are original installed before the deck-house was fitted.                   
It is at this moment not my intention to remove the complete deck-house since most of the wood of the deckhouse is in a good condition. The complete teak with the sub-deck had to be removed for installing a new teak deck.                                                                                                                                                                 First step was to remove all the plugs and screws which hold down the teak deck on the transversal beams this to create as less as possible damage to these beams which most are in a good condition in my case. The next step was to cut with a Multi Tool through the deck where it joins the deck-house.     

 The deck was then carefully removed from the transversal and longitudinal deck beams, the Teak planks were hold in place with copper nails through the sub-deck into the beams. After the deck was remove wood of the deck is still under the deck-house which needs to be removed as well. With a small chisel and hammer this wood was carefully removed, it showed during this process that the sub deck would not move as well as that at certain points the teak plank would not give away.               
                                           

Further inspection showed that at the point where the deck house was placed on the teak deck that the teak planks were screwed in the longitudinal deck beams as well as that the sub-deck was nailed into the deck beams.


 As one can understand it is at this point impossible to remove the screws and nails therefore the Multi tool was used again with a special saw blade for metal, the crews and nails were cut between the beams and the sub-deck leaving behind a smooth surface. The “groove “ where the sub-deck and the teak were fitted between the beam and the deck-house were than cleaned properly from all rest pieces of wood and the original kit used for water tightness.


After the deck was removed some more rotten wood was found mainly at the point where the air intakes are positioned for the engine-room. As can be seen from the pictures beams were rotten away as well as a part from the wall between the cabin and steerage space, replacement of parts of this wall will be described in a later stage.  


New beams were installed in place of the air intakes and the same time to prevent rot in the future this complete area was cleaned and protected with 2 component thin epoxy, except of the hull of course which is regular coated with linseed oil. Marine plywood, 6 mm like original was both side coated with this 2 component epoxy to protect it against the weather.  Before installing the sub deck at the position of where it will be glued with 2 component epoxy onto the beams the sub-deck is sanded to get a good bond.


The new pieces of the sub deck are than glued onto the beams and screwed down onto the beams, to make sure that a good bond would be created as well as to prevent that holes would exist between the beams and the sub-deck the amount of epoxy glue used was more than actually needed. This resulted of course that on all sided epoxy would come out between the parts which were glued together. This excessive amount of epoxy was removed before hardened and reused to close the holes from the screw of earlier installed pieces of the sub-deck.

After 24 hours the glue had cured and the screws were removed, screw holes filled with a thin epoxy to make sure that not holes would remain in the sub-deck which could result in the future water ingress. When the complete deck was installed it was sanded with a course sand paper grid 80 to remove the high spots where wood was glued against each other as well as the rest of the sub-deck. Than a new layer of thin 2 component epoxy was rolled over the complete deck since during the sanding on several placed the original epoxy was removed due to the sanding.


The next step will be installing of the teak deck which will be another addition to this blog.


Friday, December 16, 2011

Chrome Parts

     
                                                   Chrome Parts

Since I do want to bring the Boat back to original as possible it was decided to have all parts brought back to their original chrome status.  It took some time to find a company who can perform the old fashioned trade of treating parts with chrome. There are several companies on the marked which will do a chrome job but are not able to perform the complete required treatment of treating parts with chrome, important steps for a proper job are missed. Next you will find a link how it should be done in my opinion.


One thing to be taken in consideration of have parts be treated with chrome is the price since a good reliable treatment of parts is not cheap compared to new stainless steel parts.
But in my case I want to bring the boat back to an original condition and the same type of parts cannot be obtained in stainless steel.

As can be seen from the following pictures there is a definite difference of before and after and although in some cases buying news stainless steel parts might be cheaper it will never look the same as chrome parts.
In The Netherlands I have found the following company, www.verchromen.nl , who perform the proper task of reconditioning the chrome parts of the boat, of which several were painted with silver paint.


Tuesday, December 6, 2011

Replacement of the deck of the bow

December 2011
                                                              Replacement of the deck of the bow.

After installing the longitudinal deck beams under the deck the complete deck of the bow needed as well to be replaced. This included all the deck supports, support for the escape hatch as well as other needed supports for deck equipment. This replacement will be done in two steps first step is to remove the old deck and replace the needed deck supports with a new marine 6 mm plywood deck.
Second step will be the installation of a new teak deck.
A start was made by removing a  part of the deck, we did not want to remove the complete deck at once since the installed new longitudinal deck supports needed final shaping with the transversal deck beams. The first part of the deck which was removed was between the actual bow and the forward bulkhead, this included two deck supports.

By removing the complete deck not at once but in parts we could keep a reference between the old installed deck and the new to be installed deck. After installing the first deck supports we had a reference  between the old deck and the new installed deck supports preventing that the new to be installed deck would be in a different position, higher or lower, than the original installed deck.
 The new deck supports were made from pine and were shaped according the old removed supports, this was done one by one by more or less a copy paste of the old removed deck support. They were kept longer at the ends than the original ones and shaped to the correct length when installed. The reason that they were kept longer than the original ones has to do with the fact that also new longitudinal deck  were installed which could be in a different position from each other compared to the removed ones. After temporarily installation of the deck supports it was checked if they were not installed to high, with the old deck still in place we were therefore able to check the correct height.
To have guidance for the installation of the new deck supports a small piece of wood was installed under the original deck supports before they were removed, see also the following picture.


This support was a guide for the installation of the new deck supports and was not removed until all new deck supports were fitted in place. The deck supports were fitted in the same way as original built under an angle in the longitudinal deck beams and screwed in place, the only difference to the original installation is that we glued them in place with epoxy as well.
The last deck supports which runs on the inside of the cabin from port to starboard side needed to be made before the actually new deck could be installed, since we do not want to remove the complete deckhouse yet. This was the one in the forward cabin which is round and which has the same curve as the rest of the deck from centerline to portside and starboard side to be able to let the water run of the deck. This round deck support was laminated from marine plywood strips which were glued together with two component epoxy. To get the same shape as the original one the old deck support was cut out in one piece as much as possible and the new strips of plywood were glued one by one against this old deck support to get the same curve and shape.


After all the deck supports were installed a check was made with strips of plywood to check if the roundness of the bow was correct,  it was checked if none of the deck supports were higher or lower than the two next to it. After some minor changes and checking the complete deck supports from aft to forward it shows that all was installed as best as one could expect.


To make sure that ports side and starboard side deck beams are on the same height measurement were taken from one point of the center keel line to port and starboard, otherwise it can happen that one side of the ship is higher than the other side.
When all deck supports were fitted in their final position the support for the escape hatch was installed as well as the supports for the deck boulders. The support for the escape hatch was made from two layers of 10 mm marine plywood glued together and screwed in place on 3 deck beams. After installation it was shaped in the same curve as the deck beams where it is placed into. The actual hole for the escape hatch will be made after the teak is in place this will also result in that the deck support in the middle of the escape hatch will be cut out, this cannot be done at this moment since it provides strength for the installation of the to be installed teak deck. The supports for the deck boulders were made from oak as original.

The deck is made from 6 mm marine plywood like original, to make my life easier I have painted the inside deck white before it was installed, two layers of epoxy, the thin type with white pigment and one layer of normal white paint. This will have as a result that I have only to do some touch ups instead of painting the complete deck from inside which is time consuming.  Also the deck supports have been sanded and put in a protective layer of epoxy. Before installing this prepared 6 mm under deck the white paint/epoxy has to be removed at the position where it will be glued onto the deck supports and longitudinal beams.
The new deck was glued with epoxy on the new deck supports and screwed temporary into the deck supports for good contact.  The excess of glue was directly removed from the inside to avoid long and difficult work in a later stage by removing cured glue/epoxy. After the complete deck was installed the screw were removed,  holes filled and the completed deck was placed in a thin layer of epoxy as a protection for the winter , the next step will be completing the complete marine plywood deck around the deck house before new teak can be installed. This will have to wait till next year, 2012, since the humidity and temperature prevents that epoxy glue can be used.


Some pictures of the inside

Before new deck


After the installation of the new deck


The hole for the escape hatch will be cut after the installation of the teak