Wednesday, September 26, 2012

Teak Deck installation

                                                      Teak Deck Installation

After the sub deck was finished and before the teak deck was installed all holes in the deck were filled with 2 component epoxy filler .


Afterwards the complete deck was rolled in a thin layer of epoxy to make sure that there were no gaps between the different installed area’s where teak will be glued on, for example between the deck house and the sub deck..
After the curing time the complete deck was lightly sanded to create a good surface for bonding the teak planks onto the deck with bedding compound.
The first teak planks to be installed are the ones onto the side of the boat longer pieces for the straight side and shorter pieces were cut to seize for mainly the bow. Keeping in mind that portside and starboard side should looks the same, planks were shaped in the same length from a wider plank and installed without tension.
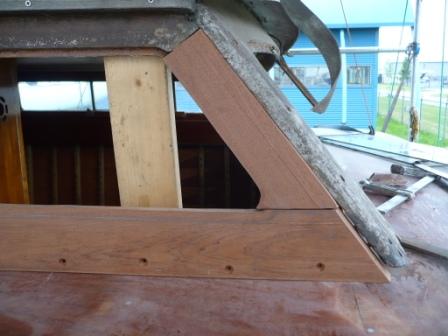
The planks were temperately screwed down into position and shaped with the sides of the boat. The planks of the complete bow were kept wider than actually required this gives the opportunity to shape them with the side of the bow as well as after final installation to make them the correct width with a router following the side and removing wood on the inside of the plank till  the sub deck, groove of the teak plank will be discussed in a later stage.  Next picture shows the left side of the bow shaped while the right side is still needs to be shaped. The way the teak pank and the bow are shaped is that a falt almost vertical surface is created to place in alater stage a teak plank for side protection.


When all was correct the side planks were cleaned-degreased coated with a primer and glued down with Sika flex bedding compound. I have used Sikaflex and have followed the exact procedures as can be found on their web side, there are of course other bedding compounds and caulking systems on the market which are suitable as well.
The next step was to clean the excess of bedding compound at the inside of the planks and than figuring out the layout of the new teak deck onto the sub deck, this takes time to came up with an acceptable layout, by placing the planks loose onto the deck. I have tried to follow the original lines of the teak deck and this cannot always be followed due to the wider teak planks which are now on the marked 48 mm almost 2``.
When the layout was decided the planks were cut to the correct length and temperately mounted down with block of wood  and clamps. I made small blocks of wood which were screwed down into the deck beams holding the teak planks in place during the dry fitting and during the actual gluing down onto the deck.
The holes were filed with bedding compound.
As can be seen from the nextt picture due to the groove in the teak plank it is possible to push the plank against the next plank and at the same time holding it down into position this methos was mainly used for the side panks since they are placed under a little tension to able to following the curve of the boat.


The next step was how to finish the teak against the deck house, original built the teak deck was installed and during a later stage the deck house was placed on top of the teak deck. Since I changed the construction the deck house runs now completely till the sub deck the teak will be placed against the deck house. There are two solutions one is to continue from the outside to the inside and make the last teak plank finish against the deck house and make it fit or place a teak plank from the same width against the deck house and fit the plank next to this plank and shape it in position. This is in my opinion the best and most nice way to do it. Although the teak experts will tell us to start installing the teak deck at the deck house and finish at the side it is the first time I  installed a teak deck and I thought this was the best and easiest way to do it.


The next step was to shape the finishing planks in place bear in mind that I made the mistake to shape a long plank. When a long plank is bend after it is shaped it can not bend well  and start to twist which will result that it will not fit properly, therefore I made sure that the finidhing plank was fitted with the minimum tension in place. This took a lot of measurements and time for fitting and shaping. It is important that I took the time to do this since I otherwise might have ended up with wider grooves between the planks which will not look nice after the deck is caulked and sanded.


When the planks were shaped to my satisfaction they were glued in place with bedding compound clamped where required and hold in position with wooden blocks. I noticed that it is important to have no gap between the planks during gluing down otherwise the bedding compound will fill up the groove between the planks and it is a lot of work removing it in a later stage with the chance of damaging the teak planks. Planks were hold also into position and pushed into the bedding compound with sand bags. No more than two maximum 3 planks were glued down at the same time. First were the two sides finished onto the sub deck.


Next part to be glued in place was the stern deck which was done in two times since it were short plank without any tension to be able to keep into position, also here were block sued and sand bags.

The stern was done after the sides were finished to get a good contact between the side planks and to make sure that the caulking lines would be followed. If one starts firts with the stern deck it will be difficult to match the side decks a small change in the angle between the stern planks and the side deck will result in a tapered gap between the stern deck and the side decks creating a strange caulking line. Therefore I started with the side decks.


Than came the deck of the bow, actually it was a bit easier since the planks can be glued down without any tension compared to some tension in the teak planks of the sides. First thing which was done was to decide the centerline of the deck and the width of the king plank . The sides planks in place more or less decide the layout of the teak planks from the bow deck, angle where the side planks come onto the bow deck. It was than installing one plank at the time port side starboard side and measuring their end position against the side plank to make sure that from the centerline the planks on both sides end up on the same position, If this is not done correctly the planks which end up against the king plank left and right will not match up which will be visible and will not look nice. In my case the planks almost lined up correctly left and right of the king plank with only a few mm difference.


The following step was to glue the teak planks down in position same plan was followed few planks ports side few planks starboard side hold in position by wooden blocks screwed into the deck beams and hold down by sand bags.


When the complete deck was glued down and time for curing the bedding compound was taken in consideration the grooves between the planks were cleaned The groove between the side plank and the teaks panks ending at the side plank were made with a router smaller than the width of the actual groove, a 4 mm router was used for a 6 mm groove. The router followed the side of the ship so creating a groove in line with the side of the ship. A 4 mm router was used this gives some flexibility with cleaning the extra bedding compund between the planks without having the chance to damaging the wood. Only disadvantage is that twice the router needs to be adjusted for the correct width of the groove which is eventually 6 mm.


Another method was also used for cleaning the grooves from the excess of bedding compound and creating the correct width of the groove where required, for example the shaped planks. A straight router was mounted on a base plate with two half round bolts which were out of line with the actual tool bid the two half round bolts gave the opportunity to guide the router through the grooves without removing any wood just removing the excess of the bedding compound while following the groove to be cleaned.

P


Since there were some of the grooves not pre-cut the same principle was used for cutting a new groove between the planks. It was made sure that one of the two planks has the original groove which is a part of the plank for guidance of cutting the correct width of the required groove between the two planks. The following picture shows a partly cut groove between two planks as can be seen the original groove is on the plank placed against the deck house which was followed with the router to create the complete groove between the planks.


When all grooves were cleaned and cut were required the complete deck was vacuumed and grooves checked for their cleanliness, it showed that also that the new teak deck was almost the same as the original installed teak deck.


When all the grooves were degreases and prepared for the deck caulking in one day the complete deck was caulked, bearing in mind to push the caulking into the grooves with a flat knife and leaving an excess of caulking sticking above the planks. Other method is to tape next to each groove before the caulking is applied which in my opinion creates a lot of extra work especially since the complete teak deck needs to be sanded and the excessive caulking will be sanded away. It was made sure that where grooves ended against the hull that tape was placed to prevent caulking running out between the grooves.


A finished deck with caulking does not look very appealing but when sanded it will look great in my opinion.


After a period of two weeks caulking needed to be placed between the teak deck and the deck house although enough bedding compound was used when installing the teak planks against the deck housebedding compound was pushed out between the teak planks and the deck house. An extra filler needed to be placed between those two surfaces in my opinion. Before this filler could be placed the teak planks next to the deck house needed to be sanded when this was done all was degreased and tape was placed for applying the caulking. Directly after the caulking was finished the tape was removed and the caulking left to dry.
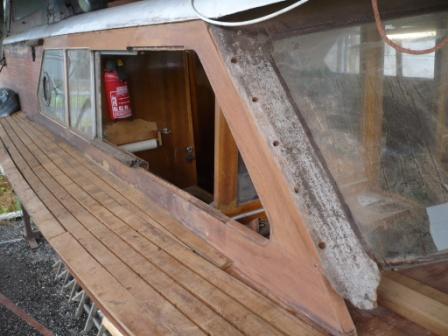


The aft deck was completely sanded for the installation of new window frames the same was done with the bow deck but only in the position of the new window frame. During this sanding it showed that a few air bubbles were entrapped into the caulking resulting into holes these holes were cut out degreased and filled again with caulking, in this case tape was used to make sure that no caulking would end up onto the sanded deck. Sanding again caulking from the teak planks might result inlower spots on the teak deck which can result in places were water will collect.


The old window frame was placed onto the teak deck of the bow and the good part was that it fitted without any major gaps, only thing left is now to sand completely the teak deck but that will be done in later stage since more work needs to be done at the deck house, new window frames of the bow and stern windows, which will be the next blog.


Wednesday, July 11, 2012

Steering cabin Hull Repairs


                                 Steering cabin hull repairs

It was noticed before the installation of the actual teak deck could start that there were a few pieces of wood of the forward cabin, aft cabin and the steering hut had rotten wood where it is connected to the deck.
The main challenges were port side from the front cabin window to the aft side of the aft cabin, starboard side front part of where the side window meets the front window and a small part starboard side aft cabin corner of the window.

On portside instead of replacing small parts of the wood it was decided to remove complete the first plank of the deck house from the front cabin aft window to the end of the aft cabin port side.


Although difficult to see from the next picture earlier repairs were made with some kind of epoxy with wood chips this needed complete to be removed as well.


Before the plank was removed supports were place inside of the cabin to keep the deck house in the same and correct position, it is important to spent quite some time installing these supports otherwise the windows will not close properly anymore.

 
The new to be installed plank was then placed in position, 5 meter/ 15 foot long although one would expect that this would be a straight forward installation it took quite a long time to get the plank fitted properly.
The reason for this is that not only the deck is placed in an angle compared to the deck house but also the deck is not completely plat over 5 meter length and runs in a small curve.

When all fitted well and the plank was in place the position of the aft cabin windows was marked on the plank, plank removed again and the necessary wood was cut out.


The next step was to fabricate the vertical aft window frame, and connect this to the horizontal lower window plank, new, and the horizontal top window frame old and still in place.
Same challenges with this piece of wood the horizontal plank should be properly fitted in place due to the angle between the deck and the deck house.


Original construction was used for installing this piece of window frame vertical window part had two wooden pegs with fitted in the original top window frame and in the new bottom window frame.


First the wooden pegs were cut out of the extra wood of the vertical window frame next step was to cut out a hole in the horizontal new window frame, first small holes were drilled next step larger holes were drilled and then the rest of the wood was removed with a chisel and hammer till all fitted correctly.


Than the complete plank was glued with colored epoxy glue in place while at the same time the vertical window frame was glued in place as well. This needed to be done otherwise it is impossible to get this vertical window frame fitted.
To make sure that the still installed plank of the deck house would like up with the new to be installed plank wooden pegs were installed in a groove in both planks.
These grooves were made with a specific tool designed for these purpose unfortunately I forgot to make pictures of this type of installation. On the inside of the cabin the new plank was kept in place with small blocks of wood screwed to the new plank and to the deck support beam, both should line up.


With the new plank fitted the actual window frame needed to be worked on to be able to fit the actual windows.
Window frame were kept smaller than actually needed, few mm and sanded down to the correct seize to be able to fit the windows.
First the windows were placed in front of the wood, markings were made windows removed and with a router the actual groove was made to fit the actual window in place.


When everything fitted correctly the window frame groove was coated with thin epoxy to protect the wood from water for the future.


Last picture shows the finished installation of the window frame with the plank screwed in place to the inside beams and holed plugged.


Next larger window frame repair was the starboard side front cabin window frame.
Portside window frame in the same position is still in good condition.

As can be seen from the following pictures there is quite an amount of rotten wood on both horizontal and vertical frames.


The window frame was cut away until good solid wood was found and a new frame was made.


The vertical window frame from the front windows will be replaced in a later stage but was needed to get the correct angle of installation of the vertical window frame of the side window.

Since the window frame of the transversal front windows was disconnected from the deck it had moved slightly in the direction of the aft ship. As can be seen from the next picture the front window moved in the aft ship direction after removal of the vertical side window frame.


This had as a result that the first vertical window frame although fitted well did not look very good it was tapered. Also due to the rotten wood it was not possible to take good measurements of the removed wood.

In short a new part of the window frame was made and installed in the same way as the aft vertical window frame was fabricated.


As can be seen from some of the last pictures some teak has been installed.
The teak deck installation will be the next blog when the complete teak deck installation is finished.
Unfortunately at this time the weather is not in favor for completing the installation of the teak deck lots of rainy days


Tuesday, May 1, 2012

Preparation for Teak Deck


                                   Preparation for Teak Deck Installation


Due to the removal of the original teak deck between the sub deck and the deck house a gap remained.
This gap needed to be closed before the actual installation of the teak deck could be started.

There were two options discussed to close the gap, one was to fabricate a teak plank which would be slide under the deck house and at the same time would be a “guide” plank where the teak deck planks would be fitted against, the challenge here was that the gap was bigger than the new to be installed teak plank 12 mm compared to the original 16 mm. Second option was to fill the gap between the new sub deck and the deck house with a mahogany filling plank.
The last option was chosen.
Since there is some damage to the deck due to the removal of the teak planks it was decided to place a slightly thicker filling plank than the actual width of the gap.


First step was to fabricate a filling plank bearing in mind that the gap was around 16 mm, original thickness of the teak it was decided to make the filing plank 19 mm thick, this way approximately 4 mm was removed from the bottom side of the deck house, 1 mm for the thickness of the multi tool saw-blade.
Since there is an angle between the deck house and the actual deck, angle measurements were taken before the actual filling plank was made, bearing in mind that the filling plank should make a 90 degree angle with the sub deck.


With the filling plank prepared approximately 3 mm was cut from the bottom side of the deck house with the multi tool, using as a guide the to be installed filling plank.


In my case also the inside support planks between the deck house and the actual deck
beams were mainly rotten away and it was decided to completely renew these planks as well.
When these planks are removed the deck house is more or less loose from the actual deck construction and can move downwards and outwards. This might result in that when the filling planks are glued in position that the deck house will not be in the original position anymore. Therefore several temporarily supports were installed between the deck beams and the deck house. After these supports were insalled the complete plank was removed.


The new filling plank was fitted and glued in place with two component epoxy glue with an added mahogany pigment to match the color of the wood installed
To make sure that the glue line would be minimal pegs were installed to push the filling plank against the original deck house. Also the filling plank was installed in such a way that it slightly was sticking out of the deck house.


After curing of the glue the filling plank was sanded smooth with the deck house in the same angle as the deck house, this means a small part was removed from the filling plank at the top, but not at the bottom.


The reason that the bottom should not be sanded is that the bottom side of the filling plank should be with a 90 degree angle with the sub deck for proper installation of the new teak deck as can be seen from below picture


When everything was sanded and protected with linseed oil the result is more than satisfying in my opinion, also the next picture shows the teak plank in front of the filling plank under the deck house.


A new plank between the deck house and the deck beam was installed inside and plugs which was fixed in place with news screws and plugs.